

 Posts


Looking for NO-FEE Concierge Disney Vacation Planning? I'd love to chat with you about how to make your family's Disney Vacation (World, Land, Cruise, Aulani, Hilton Head, Adventures) seamless, fun (even for you Mom!) and full of life-long memories. Email me at Lareina@WaltsWorldVacations or on Facebook at Lareina with Walt's World Vacations.

Disney World.
The mention of the Mouse brings a smile to my face, and my mind cues the montage reel of wonderful family memories.
Disney World brings out the kid in me - the excitement, the anticipation and the screaming fun - from childhood to adulthood it has been a constant in my life.
I've found the only thing better than going to Disney myself has been bringing my kids there. It's magical see that same wonderment through their eyes, and to create new family memories.
However, as magical as Disney World is - with two kids (our maiden voyage) it's also a lot of work and planning. You can still have fun and enjoy the magic if you sprinkle some pixie dust on the family - and follow my 'Must Know For Planning - Disney World With Kids' guide.
1. Study the Mouse
I've found that my preparations for Disney World were akin to studying for a (fun?!) final exam, and the preparations start 180 days in advance. Familiarize yourself with the maps of the parks, know where the rides are, check out the menus for restaurants (especially if you have picky kids), learn which rides your kids are tall enough to ride, and which they might want to do vs. avoid (some are a little scary). Having a working knowledge of the layout of Disney is very helpful.
2. Decide if you're staying onsite or off site. There are pros and cons to each.
Staying Onsite:
My favorite place to stay at disney at the moderate level cost is Port Orleans French Quarter. They have Queen sized beds and I love that it's one of the smaller resorts and has an adorable New Orleans atmosphere.
Pros - parking is free at the hotel and at the parks, you're closer to the park and can use their transportation around the parks, although you can use it if you stay off site too. You are eligible for packages like free dining when it's offered, some feel it's fun to not leave the Disney campus and live in the themed Disney ambiance. They have adorably themed pools and the customer service is top notch. They don't charge a resort fee on top of their advertised room fees.
Cons - much smaller rooms/lodging, typically have the whole family sharing sleeping quarters - which we have found to be awful with small children. No kitchens, no washer/dryers in rooms, only a public pool. Depending on the hotel you stay at, it can be a hike from the parking lot to your room.
Staying Offsite:
Pros: Lower cost, more room, private pools, washer/dryer, full kitchen, parking directly in front of the hotel, can reduce food costs by cooking in full kitchen.
Cons: A little further from the parks, you need to rent a car or drive there, must pay for parking $18 a day (last I saw) at the parks (or do what we did below). Lose the Disney ambiance. You aren't eligible for free dining packages.
We've stayed in a hotel, a 2 bedroom villa and a rental house. The only down side was paying for parking, which we avoided by parking at the Boardwalk and eating breakfast there, or grabbing breakfast at the Polynesian and parking there before going into the parks. I'd rather pay $20 for a quick breakfast at the Polynesian and take the monorail into Magic Kingdom versus $18 for parking at the park.. You can walk right in the back side of Epcot entering near England with about a mile walk from the Boardwalk free parking.
Hotel: I wasn't thrilled with the hotel because they charged a "resort fee" and made you pay for parking at the hotel, there wasn't space in the room and you had to pay for parking at the parks as well. I wouldn't stay at an offsite hotel again with small children.
2 Bedroom Villa: We stayed most recently at the Vistana Resort and really loved it. The cost was reasonable, we had plenty of room including separate sleeping quarters for us in one room and the kids in another, there was a huge jacuzzi tub I went in EVERY night. After a long day in the parks (and being 34 weeks pregnant) that was an amazing bonus for my feet and body. The beds were comfy, pool was large, it was very clean, we had a fully stocked kitchen and washer/dryer right there. It was on the 1st floor and we could park directly outside the door - no additional schlepping was a bonus at the end of the day. It wasn't that long of a drive into the Disney parks, approx 15min. Their shuttle service to the parks is not good though.
Rental House: We rented a house called Story Time Castle when we had 3 families (3 kids) going and that was a nice experience because there was plenty of room for everyone, there was a kitchen to help reduce the cost of eating out and prepping lunches to bring to the park, there was a washer/dryer and a princess themed room with two twin beds and a cars themed room with two twin beds, plus 3 other rooms for the adults with Queen or King sized beds. Overall there was tons of room and we loved that we could put the kids to bed at night with a monitor and go spend time floating in the private pool off the kitchen. It was about 15 minutes from the parks. The only negative was that there were bugs on the 1st floor, which I understand are hard to avoid in FL, but overall we felt it was pretty clean other than the bug issue in the bathroom on the 1st floor.
3. Develop an outline of which parks you'll visit each day in advance

I used the crowd estimator from http://www.easywdw.com/ to determine which parks would be best to go to on each day of our stay, and it seemed to work well. You can also decide which weeks to visit based on the estimated crowd capacity. If it's a holiday it's going to be busy. If you can go in January (after the first week) that is the bees knees, low crowds and non-melting weather.
I had a calendar app I used to keep track of where we were going to be when, the show times and the time of our FP+'s and reservations for dinner/lunch.
I also read several blogs that suggested touring plans for each park.
4. The early bird gets the dining and experience reservations

Make reservations for experiences (like the Bippity Boppity Boutique) and Royal Table as soon as possible because reservations are limited and can be impossible to get if you wait. You can make both 180 days in advance if you are staying on site.
5. Familiarize yourself with My Disney Experience website & download the app for your smart phone.

This will prove worthwhile in the end, but may make you want to tear your hear out initially (I'm still combing over my bald spot..)
The problem in a nutshell? It's paaaainfully slow, has hiccups, service outages, and the FastPass+ system was a clusterF even for my computer savvy self. Eventually the website and I found some common ground and it 'worked' for me once I learned its bad habits. It has gotten slightly better in the last year or so.
6. Make Fast Pass+ reservations in advance
You can always change them if you need to, but make them for the popular rides even if you think you might change them. I found that as long as your selected time slot hadn't begun you could make changes.
However, FastPass+'s (FP+) are limited and availability changes throughout the day. If you couldn't get the ride you wanted earlier in the day try again as the day goes on from your smartphone. Make your FP+'s for earlier in the day if possible, once you have used your allotted 3 per person you can add FP+ if there is availability one at a time at the kiosks throughout the park.
One of the best FastPass+ options I used was for the Electric Street Parade at Magic Kingdom. They have a roped off area for the FP+ reservations, and we got lucky and were able to sit on a bench in front of the castle and watch all the floats go by, we stayed in our seat and were able to watch the fireworks that followed. Pure Disney Magic on our last night there!
7. If you have small kids, take advantage of their Rider Switch Service - and read my hint on how to maximize this service below.
This service is only for certain rides that have height restrictions where part of your party can't/doesn't want to ride. Basically everyone goes to the ride's entrance and you tell the cast member that you need a rider switch card. Dad and whomever wants to ride get on the ride (you can use your FP+ or this) and then Mom waits with whomever can't/doesn't want to ride. Dad et al. finish and then Mom plus 2 people can use the rider switch to get into the fast pass entrance to ride.
There's a special trick to working it to it's full advantage along with the FP+ system.
1. Players: Mom, Dad, Sis, Bro & Lil Bits who can't ride.
2. Each get a FP+ for Seven Dwarfs Mine Train (4 FP+ total): Dad&Bro @ 9am. Mom&Sis @10am
3. Dad&Bro get a rider switch card and use their FP+ at 9am, Mom&Sis wait with Lil Bits. When Dad&Bro are done riding Mom,Sis&Bro use the rider switch card (good for 3 people) to ride while Dad stays with Lil Bits.
4. Mom&Sis get a rider switch card and use their FP+ at 10am, Dad&Bro wait with with Lil Bits. When Mom&Sis are done riding Dad,Sis&Bro use the rider switch card (good for 3 people) to ride while mom stays with Lil Bits.
5. This way Mom&Dad both get to ride 2 times and Sis&Bro both get to ride 3 times - all with only using a total of 4FP+'s!
8. Buy extras for your digital stuff.
Remember to charge your electronics, and buy an extra memory card for your camcorders and cameras - they will come in handy. Bring a plastic sealable bag for your electronics just in case - and an extra boost of power for your smart phone if you can get one. Note that Disney has banned selfie sticks. Have fun and check out my other Disney Tips Blogs below!
Must Know Tips for While In The Parks - Disney with Kids
http://momaboutcharlotte.blogspot.com/2014/01/the-must-know-while-in-parks-tips-for.html
1. Study the Mouse
I've found that my preparations for Disney World were akin to studying for a (fun?!) final exam, and the preparations start 180 days in advance. Familiarize yourself with the maps of the parks, know where the rides are, check out the menus for restaurants (especially if you have picky kids), learn which rides your kids are tall enough to ride, and which they might want to do vs. avoid (some are a little scary). Having a working knowledge of the layout of Disney is very helpful.
2. Decide if you're staying onsite or off site. There are pros and cons to each.
Staying Onsite:
My favorite place to stay at disney at the moderate level cost is Port Orleans French Quarter. They have Queen sized beds and I love that it's one of the smaller resorts and has an adorable New Orleans atmosphere.
Pros - parking is free at the hotel and at the parks, you're closer to the park and can use their transportation around the parks, although you can use it if you stay off site too. You are eligible for packages like free dining when it's offered, some feel it's fun to not leave the Disney campus and live in the themed Disney ambiance. They have adorably themed pools and the customer service is top notch. They don't charge a resort fee on top of their advertised room fees.
Cons - much smaller rooms/lodging, typically have the whole family sharing sleeping quarters - which we have found to be awful with small children. No kitchens, no washer/dryers in rooms, only a public pool. Depending on the hotel you stay at, it can be a hike from the parking lot to your room.
Staying Offsite:
Pros: Lower cost, more room, private pools, washer/dryer, full kitchen, parking directly in front of the hotel, can reduce food costs by cooking in full kitchen.
Cons: A little further from the parks, you need to rent a car or drive there, must pay for parking $18 a day (last I saw) at the parks (or do what we did below). Lose the Disney ambiance. You aren't eligible for free dining packages.
We've stayed in a hotel, a 2 bedroom villa and a rental house. The only down side was paying for parking, which we avoided by parking at the Boardwalk and eating breakfast there, or grabbing breakfast at the Polynesian and parking there before going into the parks. I'd rather pay $20 for a quick breakfast at the Polynesian and take the monorail into Magic Kingdom versus $18 for parking at the park.. You can walk right in the back side of Epcot entering near England with about a mile walk from the Boardwalk free parking.
Hotel: I wasn't thrilled with the hotel because they charged a "resort fee" and made you pay for parking at the hotel, there wasn't space in the room and you had to pay for parking at the parks as well. I wouldn't stay at an offsite hotel again with small children.
2 Bedroom Villa: We stayed most recently at the Vistana Resort and really loved it. The cost was reasonable, we had plenty of room including separate sleeping quarters for us in one room and the kids in another, there was a huge jacuzzi tub I went in EVERY night. After a long day in the parks (and being 34 weeks pregnant) that was an amazing bonus for my feet and body. The beds were comfy, pool was large, it was very clean, we had a fully stocked kitchen and washer/dryer right there. It was on the 1st floor and we could park directly outside the door - no additional schlepping was a bonus at the end of the day. It wasn't that long of a drive into the Disney parks, approx 15min. Their shuttle service to the parks is not good though.
Rental House: We rented a house called Story Time Castle when we had 3 families (3 kids) going and that was a nice experience because there was plenty of room for everyone, there was a kitchen to help reduce the cost of eating out and prepping lunches to bring to the park, there was a washer/dryer and a princess themed room with two twin beds and a cars themed room with two twin beds, plus 3 other rooms for the adults with Queen or King sized beds. Overall there was tons of room and we loved that we could put the kids to bed at night with a monitor and go spend time floating in the private pool off the kitchen. It was about 15 minutes from the parks. The only negative was that there were bugs on the 1st floor, which I understand are hard to avoid in FL, but overall we felt it was pretty clean other than the bug issue in the bathroom on the 1st floor.
3. Develop an outline of which parks you'll visit each day in advance
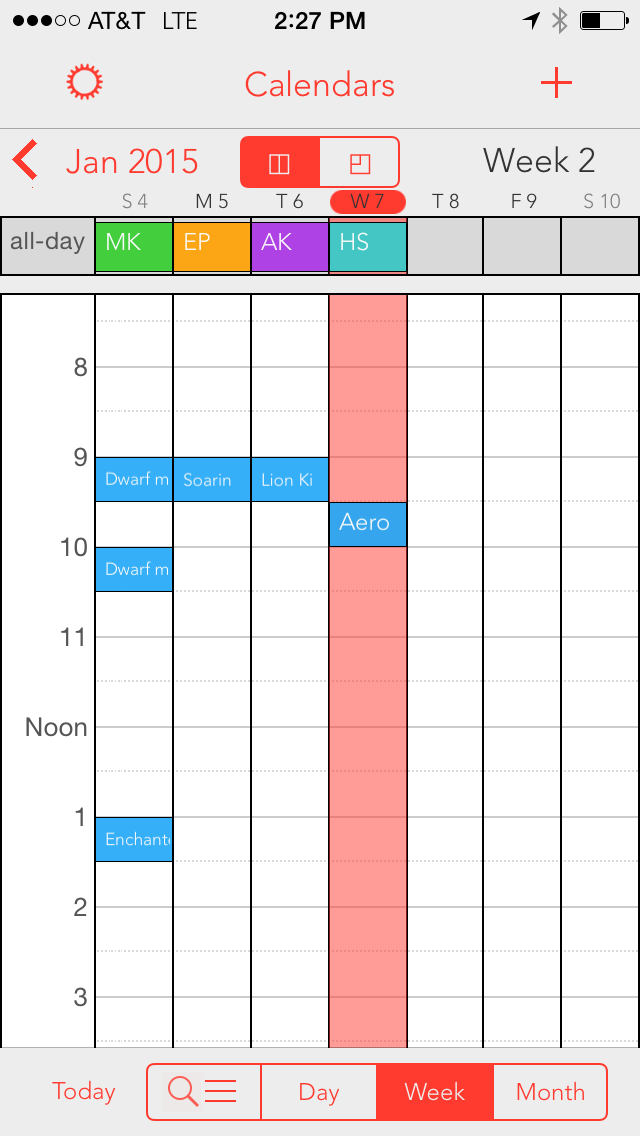
I used the crowd estimator from http://www.easywdw.com/ to determine which parks would be best to go to on each day of our stay, and it seemed to work well. You can also decide which weeks to visit based on the estimated crowd capacity. If it's a holiday it's going to be busy. If you can go in January (after the first week) that is the bees knees, low crowds and non-melting weather.
I had a calendar app I used to keep track of where we were going to be when, the show times and the time of our FP+'s and reservations for dinner/lunch.
I also read several blogs that suggested touring plans for each park.
4. The early bird gets the dining and experience reservations

Make reservations for experiences (like the Bippity Boppity Boutique) and Royal Table as soon as possible because reservations are limited and can be impossible to get if you wait. You can make both 180 days in advance if you are staying on site.
5. Familiarize yourself with My Disney Experience website & download the app for your smart phone.

This will prove worthwhile in the end, but may make you want to tear your hear out initially (I'm still combing over my bald spot..)
The problem in a nutshell? It's paaaainfully slow, has hiccups, service outages, and the FastPass+ system was a clusterF even for my computer savvy self. Eventually the website and I found some common ground and it 'worked' for me once I learned its bad habits. It has gotten slightly better in the last year or so.
6. Make Fast Pass+ reservations in advance
You can always change them if you need to, but make them for the popular rides even if you think you might change them. I found that as long as your selected time slot hadn't begun you could make changes.
However, FastPass+'s (FP+) are limited and availability changes throughout the day. If you couldn't get the ride you wanted earlier in the day try again as the day goes on from your smartphone. Make your FP+'s for earlier in the day if possible, once you have used your allotted 3 per person you can add FP+ if there is availability one at a time at the kiosks throughout the park.
One of the best FastPass+ options I used was for the Electric Street Parade at Magic Kingdom. They have a roped off area for the FP+ reservations, and we got lucky and were able to sit on a bench in front of the castle and watch all the floats go by, we stayed in our seat and were able to watch the fireworks that followed. Pure Disney Magic on our last night there!
7. If you have small kids, take advantage of their Rider Switch Service - and read my hint on how to maximize this service below.
 |
| Photo Cred: http://4travellers.com.ar/wp-content/uploads/2015/06/IMG_8962-0.jpg |
There's a special trick to working it to it's full advantage along with the FP+ system.
1. Players: Mom, Dad, Sis, Bro & Lil Bits who can't ride.
2. Each get a FP+ for Seven Dwarfs Mine Train (4 FP+ total): Dad&Bro @ 9am. Mom&Sis @10am
3. Dad&Bro get a rider switch card and use their FP+ at 9am, Mom&Sis wait with Lil Bits. When Dad&Bro are done riding Mom,Sis&Bro use the rider switch card (good for 3 people) to ride while Dad stays with Lil Bits.
4. Mom&Sis get a rider switch card and use their FP+ at 10am, Dad&Bro wait with with Lil Bits. When Mom&Sis are done riding Dad,Sis&Bro use the rider switch card (good for 3 people) to ride while mom stays with Lil Bits.
5. This way Mom&Dad both get to ride 2 times and Sis&Bro both get to ride 3 times - all with only using a total of 4FP+'s!
8. Buy extras for your digital stuff.
Remember to charge your electronics, and buy an extra memory card for your camcorders and cameras - they will come in handy. Bring a plastic sealable bag for your electronics just in case - and an extra boost of power for your smart phone if you can get one. Note that Disney has banned selfie sticks. Have fun and check out my other Disney Tips Blogs below!
Must Know Tips for While In The Parks - Disney with Kids
http://momaboutcharlotte.blogspot.com/2014/01/the-must-know-while-in-parks-tips-for.html


