Anders Ruff Workshop

Pineville and Davidson, NC

Disney Hacks

Stroller Edition

Adventure Air

Rock Hill, SC

Showing posts with label Travel. Show all posts

Saturday, June 11, 2016

Shannon Tanner's Most Excellent Pirate Expedition - Hilton Head Island,SC

Our family has been enjoying the beautiful beaches, delicious dining and many family-friendly adventures in Hilton Head Island, SC for the last five years. It's a short four hour drive from Charlotte, NC and is the perfect answer for a fun, picturesque family vacation.


During our most recent visit we had the opportunity to participate in Shannon Tanner's FREE Family Show at Shelter Cove Harbour, which runs Mon-Fri at 7PM and 8:30PM 6/1-9/2/16. This show is a must see for families visiting Hilton Head Island - our kids were instantly engaged as they sang, bounced and scrambled their hair to Shannon's songs and dances. Many Tuesdays they have fireworks at 9:30PM! During the show we learned about Shannon Tanner's Most Excellent Pirate Expedition, my kids were enthralled with the idea. We had been looking for a water adventure that was a good match for our 1, 3 and 7 year old's interests. I figured if the pirate expedition was as appealing to as the show, booking was a no-brainer.


It was easy to book online at piratekidzofhiltonhead.com, and I was pleased that there were no additional costs for the online convenience (mama hates fees). Tickets can also be purchased the night of the show or the morning of the excursion (if tickets are still available). The expedition kicks off from Shelter Cove Harbour Wednesdays and Fridays at 8:30AM and goes until about 10:30AM.

Adults are $30, kids 3-12 are $25 and kids 2 and under are free - which was great because little bits is hit or miss on any participation as a 1 year old. The pirate adventure included skull adorned pirate bandanas (you can hide your treasure in it too!), an eye patch, a foam dagger, a tattoo and a portion of the recovered treasure. From the moment we arrived Shannon was in full pirate-captain character, he welcomed each kid as he and his mates helped them pirate-ify. E loved the foam dagger and spent lots of time making pirate gestures and faces as he and S bounded around their scurvy new crew.


Shannon's enthusiasm and gift for story-telling ensured that the kids were occupied throughout the two hours we spent together. Shannon led them exploring through the harbour to find clues about the missing treasure, incorporating the kids into the story line. We boarded the large boat donned in pirate paraphernalia. Once aboard there was a good amount of shade. Usually HHI has a nice breeze along the harbour, but the day we went was about 99.9% humidity and holy pirate booty - we were melting. I would recommend bringing a personal fan and some water if your expedition day is as toasty as ours was. The older two were not at all phased by the temperature - they were too busy pirating, but did drink water. Shannon and his crew seemed unphased by the temperature and kept the show fun and exciting throughout.


We took our seats on the large white boat and we were off on the treacherous seven seas! Well - it was the harbor - and luckily the water was very calm and avoided potential sea sickness. The kids learned the proper way 'educated' pirates talk - it was cute. My husband, mother and I really enjoyed the way that Shannon crafted his script to speak the language of fun and excitement for the kids while also being charismatic and quick-witted for the adults. There were lots of interactions between the kids and the pirate crew as we searched for our stolen treasure.


During our voyage we saw two dolphins swimming nearby who 'helped' us figure out where the treasure had been taken. The kids were able to get out their aggressions in a healthy water-based way as they doused Stinky Slimy Slim with water blasters until he decided to join our family of good pirates and return the treasure.


Once the treasure was re-captured each child got to share in a few pieces of pirate gold and jewels to take home with them. Once back on land they each received a chocolate coin - what a sweet victory - and had the opportunity to get their daggers signed by the crew. The kids couldn't stop talking about what a blast they had together and all the pirate hi jinx that had ensued.


If you're bringing your family to Hilton Head Shannon Tanner's Most Excellent Pirate Expedition won't disappoint - I'm not the only one who gave this tour two swords up - check out their Trip Advisor Page here. To follow Shannon and all his crew's excitement follow them on Facebook here, and on Twitter here.


Friday, July 17, 2015

Planning Your Disney Trip With Kids - The MUST KNOW Guide

Looking for NO-FEE Concierge Disney Vacation Planning? I'd love to chat with you about how to make your family's Disney Vacation (World, Land, Cruise, Aulani, Hilton Head, Adventures) seamless, fun (even for you Mom!) and full of life-long memories. Email me at Lareina@WaltsWorldVacations or on Facebook at Lareina with Walt's World Vacations.


Disney World.

The mention of the Mouse brings a smile to my face, and my mind cues the montage reel of wonderful family memories.

Disney World brings out the kid in me - the excitement, the anticipation and the screaming fun - from childhood to adulthood it has been a constant in my life.

I've found the only thing better than going to Disney myself has been bringing my kids there. It's magical see that same wonderment through their eyes, and to create new family memories.

However, as magical as Disney World is - with two kids (our maiden voyage) it's also a lot of work and planning. You can still have fun and enjoy the magic if you sprinkle some pixie dust on the family - and follow my 'Must Know For Planning - Disney World With Kids' guide.

1. Study the Mouse

I've found that my preparations for Disney World were akin to studying for a (fun?!) final exam, and the preparations start 180 days in advance. Familiarize yourself with the maps of the parks, know where the rides are, check out the menus for restaurants (especially if you have picky kids), learn which rides your kids are tall enough to ride, and which they might want to do vs. avoid (some are a little scary). Having a working knowledge of the layout of Disney is very helpful.

2. Decide if you're staying onsite or off site. There are pros and cons to each. 

Staying Onsite: 
My favorite place to stay at disney at the moderate level cost is Port Orleans French Quarter. They have Queen sized beds and I love that it's one of the smaller resorts and has an adorable New Orleans atmosphere.

Pros - parking is free at the hotel and at the parks, you're closer to the park and can use their transportation around the parks, although you can use it if you stay off site too. You are eligible for packages like free dining when it's offered, some feel it's fun to not leave the Disney campus and live in the themed Disney ambiance. They have adorably themed pools and the customer service is top notch. They don't charge a resort fee on top of their advertised room fees.

Cons - much smaller rooms/lodging, typically have the whole family sharing sleeping quarters - which we have found to be awful with small children. No kitchens, no washer/dryers in rooms, only a public pool. Depending on the hotel you stay at, it can be a hike from the parking lot to your room.

Staying Offsite:
Pros: Lower cost, more room, private pools, washer/dryer, full kitchen, parking directly in front of the hotel, can reduce food costs by cooking in full kitchen.

Cons: A little further from the parks, you need to rent a car or drive there, must pay for parking $18 a day (last I saw) at the parks (or do what we did below). Lose the Disney ambiance. You aren't eligible for free dining packages.

We've stayed in a hotel, a 2 bedroom villa and a rental house. The only down side was paying for parking, which we avoided by parking at the Boardwalk and eating breakfast there, or grabbing breakfast at the Polynesian and parking there before going into the parks. I'd rather pay $20 for a quick breakfast at the Polynesian and take the monorail into Magic Kingdom versus $18 for parking at the park.. You can walk right in the back side of Epcot entering near England with about a mile walk from the Boardwalk free parking.

Hotel: I wasn't thrilled with the hotel because they charged a "resort fee" and made you pay for parking at the hotel, there wasn't space in the room and you had to pay for parking at the parks as well. I wouldn't stay at an offsite hotel again with small children.

2 Bedroom Villa: We stayed most recently at the Vistana Resort and really loved it. The cost was reasonable, we had plenty of room including separate sleeping quarters for us in one room and the kids in another, there was a huge jacuzzi tub I went in EVERY night. After a long day in the parks (and being 34 weeks pregnant) that was an amazing bonus for my feet and body. The beds were comfy, pool was large, it was very clean, we had a fully stocked kitchen and washer/dryer right there. It was on the 1st floor and we could park directly outside the door - no additional schlepping was a bonus at the end of the day. It wasn't that long of a drive into the Disney parks, approx 15min. Their shuttle service to the parks is not good though.

Rental House: We rented a house called Story Time Castle when we had 3 families (3 kids) going and that was a nice experience because there was plenty of room for everyone, there was a kitchen to help reduce the cost of eating out and prepping lunches to bring to the park, there was a washer/dryer and a princess themed room with two twin beds and a cars themed room with two twin beds, plus 3 other rooms for the adults with Queen or King sized beds. Overall there was tons of room and we loved that we could put the kids to bed at night with a monitor and go spend time floating in the private pool off the kitchen. It was about 15 minutes from the parks. The only negative was that there were bugs on the 1st floor, which I understand are hard to avoid in FL, but overall we felt it was pretty clean other than the bug issue in the bathroom on the 1st floor.

3. Develop an outline of which parks you'll visit each day in advance


I used the crowd estimator from http://www.easywdw.com/ to determine which parks would be best to go to on each day of our stay, and it seemed to work well. You can also decide which weeks to visit based on the estimated crowd capacity. If it's a holiday it's going to be busy. If you can go in January (after the first week) that is the bees knees, low crowds and non-melting weather.

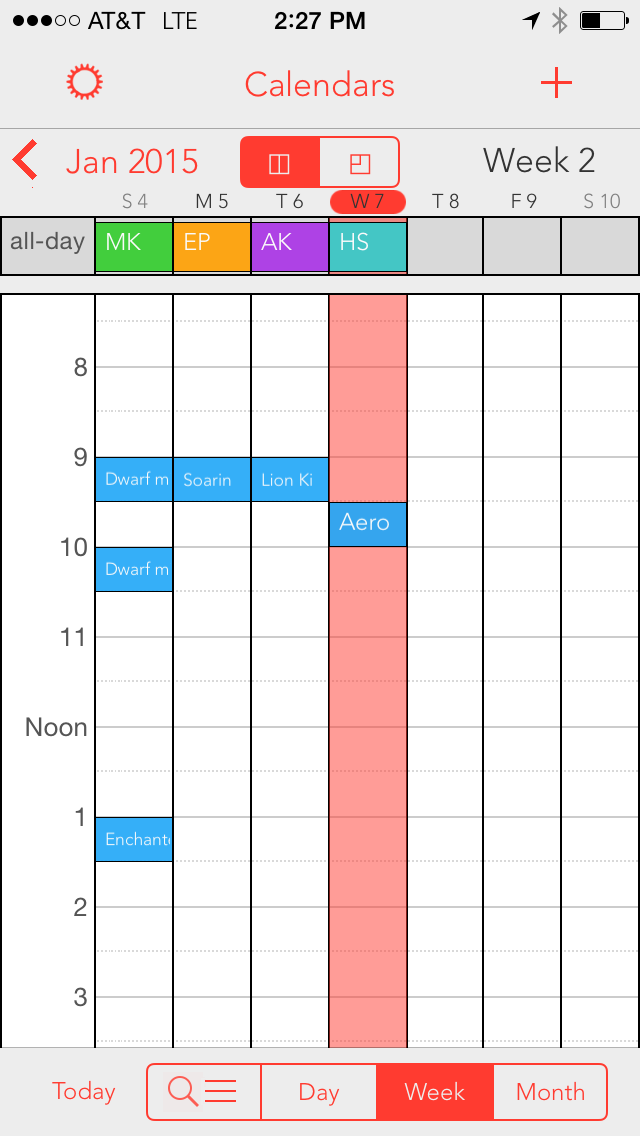
I had a calendar app I used to keep track of where we were going to be when, the show times and the time of our FP+'s and reservations for dinner/lunch.

I also read several blogs that suggested touring plans for each park.

4. The early bird gets the dining and experience reservations


Make reservations for experiences (like the Bippity Boppity Boutique) and Royal Table as soon as possible because reservations are limited and can be impossible to get if you wait. You can make both 180 days in advance if you are staying on site.

5. Familiarize yourself with My Disney Experience website & download the app for your smart phone.


This will prove worthwhile in the end, but may make you want to tear your hear out initially (I'm still combing over my bald spot..)

The problem in a nutshell? It's paaaainfully slow, has hiccups, service outages, and the FastPass+ system was a clusterF even for my computer savvy self. Eventually the website and I found some common ground and it 'worked' for me once I learned its bad habits. It has gotten slightly better in the last year or so.

6. Make Fast Pass+ reservations in advance

You can always change them if you need to, but make them for the popular rides even if you think you might change them. I found that as long as your selected time slot hadn't begun you could make changes.

However, FastPass+'s (FP+) are limited and availability changes throughout the day. If you couldn't get the ride you wanted earlier in the day try again as the day goes on from your smartphone. Make your FP+'s for earlier in the day if possible, once you have used your allotted 3 per person you can add FP+ if there is availability one at a time at the kiosks throughout the park.

One of the best FastPass+ options I used was for the Electric Street Parade at Magic Kingdom. They have a roped off area for the FP+ reservations, and we got lucky and were able to sit on a bench in front of the castle and watch all the floats go by, we stayed in our seat and were able to watch the fireworks that followed. Pure Disney Magic on our last night there!

7. If you have small kids, take advantage of their Rider Switch Service - and read my hint on how to maximize this service below.


Photo Cred: http://4travellers.com.ar/wp-content/uploads/2015/06/IMG_8962-0.jpg
This service is only for certain rides that have height restrictions where part of your party can't/doesn't want to ride. Basically everyone goes to the ride's entrance and you tell the cast member that you need a rider switch card. Dad and whomever wants to ride get on the ride (you can use your FP+ or this) and then Mom waits with whomever can't/doesn't want to ride. Dad et al. finish and then Mom plus 2 people can use the rider switch to get into the fast pass entrance to ride.

There's a special trick to working it to it's full advantage along with the FP+ system.

1. Players: Mom, Dad, Sis, Bro & Lil Bits who can't ride.
2. Each get a FP+ for Seven Dwarfs Mine Train (4 FP+ total): Dad&Bro @ 9am. Mom&Sis @10am
3. Dad&Bro get a rider switch card and use their FP+ at 9am, Mom&Sis wait with Lil Bits. When Dad&Bro are done riding Mom,Sis&Bro use the rider switch card (good for 3 people) to ride while Dad stays with Lil Bits.
4. Mom&Sis get a rider switch card and use their FP+ at 10am, Dad&Bro wait with with Lil Bits. When Mom&Sis are done riding Dad,Sis&Bro use the rider switch card (good for 3 people) to ride while mom stays with Lil Bits.
5. This way Mom&Dad both get to ride 2 times and Sis&Bro both get to ride 3 times - all with only using a total of 4FP+'s!

8. Buy extras for your digital stuff.
Remember to charge your electronics, and buy an extra memory card for your camcorders and cameras - they will come in handy. Bring a plastic sealable bag for your electronics just in case - and an extra boost of power for your smart phone if you can get one. Note that Disney has banned selfie sticks. Have fun and check out my other Disney Tips Blogs below!

Must Know Tips for While In The Parks - Disney with Kids
http://momaboutcharlotte.blogspot.com/2014/01/the-must-know-while-in-parks-tips-for.html


Wednesday, January 1, 2014

The 'Must Know' While in the Parks - Tips for Disney World with Kids

Looking for NO-FEE Concierge Disney Vacation Planning? I'd love to chat with you about how to make your family's Disney Vacation (World, Land, Cruise, Aulani, Hilton Head, Adventures) seamless, fun (even for you Mom!) and full of life-long memories. Email me at Lareina@WaltsWorldVacations or on Facebook at Lareina with Walt's World Vacations.


We brought our 5 year old daughter "S" and our 17 month old son "E" to Disney in December 2013 - here are my take away tips for what made our experience MAGICAL!

1. Pack a Grab Bag

I used a backpack with several pouches. No, my husband didn't care at all that it was pink - he doesn't mind our life of glitter and princesses ;) This is what I included in my bag so we could grab and go quickly when we had to park the stroller. FYI : All bags have to be checked before you enter into the park.
  • T-shirt, shorts, pants, long sleeved shirt, socks, underwear in a large plastic ziploc bag (which can be handy to repurpose in case of vomit, accidents or wet clothes) for each kiddo plus a jacket if necessary. 
  • Sippy Cups filled with ice (they will melt throughout the day keeping water cold) - plus at any quick service restaurant at Disney they will give you a FREE cup of water and ice to refresh your sippy cups throughout the day. 
  • Snacks - I used a snack tower that had freeze dried yogurt, crackers, puffs, honey nut cheerios, and goldfish. The squeeze apple sauce was great too - perfect for when you're waiting in line and the kids are hungry between meals. 
  • Mini first aid kit - band aids, alcohol swabs, triple antibiotic, advil
  • Sunscreen - spray, cream and stick - multiple applications will be necessary
  • Diapers/Wipes (grab 3 more than you think you'll need).
  • Toys/Entertainment - I brought tiny play dough containers, bubbles, crayons and a small pad of paper. Using small light things that will entertain the kids are great for when you're waiting in line or at a restaurant.  
  • Autograph books w/ attached pen
  • Ponchos (if we thought we might need them) if the weather looked good we left them in the car. 
  • Camera, camcorder
  • Wallet 
  • Phone & charger
2.  Bring food and one frozen bottle of water with you.


As of the writing of this blog Disney will give you a free cup of ice water at any quick serve location, and we poured those cups of water into our wide-mouthed water bottles to keep hydrated around the park. We used the frozen water bottle as an ice pack in our insulated bags with our lunch, cheese sticks and frozen yogurts (a frozen cup of yogurt that thaws over the day) to save $ on food.

3. Get a mommy hook - or two! We used these to hook our back pack on for easy grab and go access, and it came in handy for any purchases we made around the park.

4. Find your stroller day or night.


Stroller parking is required for the majority of rides, and those f**king impish stroller attendants will move them - often clear to the opposite side of where you parked it.

I combated this in two ways.

Daytime: Flag or balloon attached so you could look out over the sea of strollers and spot yours. I think a neon flag would be best. 

Nighttime: Bike blinker to help us locate it. The parking areas are not well lit and finding the right stroller in the dark can get.. time consuming.

I've never seen so many double strollers in my life. 

5. Buy glow necklaces at the Dollar Tree before you go - this will save you mad $ and help keep track of your kids when the sun goes down. We got matching ones for the whole family for easy visualization in the crowds of people.

6. DIY personalized autograph book and save $$.

 
Ours cost about $3 and we were able to personalize it instead of the $15 they charge in the park. I got the notebooks at the Dollar Tree, we had the pens, and I bought the stickers at Hobby Lobby.  Attach a click gel pen to the book with a ribbon so everything is all put together and you're not left looking for the pen.

7. Label your kids Magic Bands with Information - I used a sharpie and wrote "S's" name and our cell phone numbers in case she got lost. We also instructed her that if she did get lost to find an adult that had a kid with them, or find a cast member that was wearing a Disney name tag for help.

8. Let your kids nap wherever, and take the day as it goes - I read a lot of blogs urging me to go back to the hotel for nap time with our 17 month old. I felt like this was going to KILL our ability to see everything. We decided to press our luck and let E just pass out where he may in the reclined stroller - and it worked like a charm.

He'd fall asleep for an hour or so as we were walking from ride to ride and we would pick attractions where one of us would have had to wait anyway, like Splash Mountain.  We also got them up earlier than normal and they went to bed far later than normal. We didn't go back to the hotel once for a nap and had no melt downs - Disney Magic.

9. Park & Eat at the Hotels - We went and grabbed a quick breakfast at the walk up counter at the Polynesian and parked our car there letting them know we were getting breakfast. Then we were able to check out the hotel (for future stays) and take the monorail right in to Magic Kindgom.

When we were going to Epcot we would park at The Boardwalk and were able to walk right into the back of Epcot by England. This was helpful when we had reservations in the World Showcase and didn't have a lot of time to get there. It's also helpful to cut the cost of parking at the park's lots and will save you $18 a car if you're not staying on site. I'd rather spend that on breakfast than on parking! An added bonus is that you don't have to fold up the stroller to get on the trams from the parking lots at the parks.

10. Make sure you have comfortable sneakers - I had to end up buying a new pair while we were there. They felt OK at home but after hours of walking, not so much. The new Nike Airs worked wonders for my poor feet.

11. Fully charge your electronics (cell phones, cameras, camcorders) - Bring an extra memory card and your cell phone and camera chargers into the park - you can often charge while you are eating lunch.

12. Have fun, take lots of pictures and video and check out my other Disney Tip Blogs below!

The 'Must Know' for Planning Disney World with Kids
http://momaboutcharlotte.blogspot.com/2013/12/the-must-know-for-planning-disney-world.html


Tuesday, November 13, 2012

Riverbanks Zoo - Day Trip


So it's not exactly Charlotte, but instead a day trip from Charlotte. It's the Riverbanks Zoo and it's well worth the hour and 30 minute drive. We all packed in the minivan, packed a lunch and headed to Columbia. The drive is easy, a straight shot on Rt. 77 nearly the entire way. The zoo is just the right size, not too big and not too small - with cute up close and personal animal encounters. They have all the standards - lions and tigers and bears (OH MY!) as well as some cute little waddlers in tuxedos and a gorgeous botanical garden that is well worth the hike (AND ITS A HIKE) up to it, or be smarter than us and take the tram up!

Our favorite part was feeding the giraffes, but be aware it only happens from 11:30 - 1:30, but is well worth the $2 leafy treats they are hocking. The second favorite experience was feeding the birds ($2), my husband was able to coax one onto his hand so our daughter could hold the cup while it ate. They are mischievous little birds though, and tried time and time again to pull the cup away from her but she prevailed in hanging onto it. Pony rides were also fun and reasonably priced at $5

The animals at this zoo all seem very up close and accessible. We checked out the gorilla feeding which happened at 11:30, and the huge silver back was just on the other side of the glass and S was mesmerized as the zoo keeper talked about all things gorilla. The penguins are always so cute as they waddle and swim around and were putting on quite a show. The monkeys swung on their ropes and howled while the lions and tigers lazed around blending in with their surroundings. I missed the reptile area because I was nursing the baby, (oh darn) but S reveled at the HUGA-MONGOUS snake that was there. My favorite exhibit was the koala bears, they were perched up on their trees looking very zen and cuddly.

The botanical garden was very opulent and well labeled, there wasn't a plant that didn't have a name! There was a play ground area there as well as at the main part of the zoo for kids to run off some more steam. 
It's everything that a zoo should be, and it's clean and well maintained with changing areas in the bathrooms for the little ones. The food there wasn't very appetizing, and quite pricey so we were glad we brought a lunch to eat.
Riverbanks Zoo: www.riverbanks.org

Cost: 12+ $11.75, 3-12 $9.25, under 3 free. We joined the WNC (http://www.wildwnc.org/become-a-member/become-a-member) for a family membership costing $62, which has reciprocal privileges at the Riverbanks Zoo and 275+ other museums and zoos around the country, so we paid nothing that day. Discovery Place (not kids) is also a reciprocal museum in Charlotte.

Don't Miss:
  • Animal feedings (giraffe, bird, gorilla)
Momma Tip: Pack a lunch to bring as well as drinks, there are tables in several areas to eat